If you're looking to monetize your WordPress blog, Google AdSense is one of the easiest and most effective ways to do so. But, the process of setting it up and optimizing it for your blog might seem a bit overwhelming, especially if you're not familiar with website management. That’s where Troubleshoot Limited comes in—your go-to partner for all things WordPress and tech solutions. We help you seamlessly integrate AdSense into your blog, optimizing it for maximum revenue.
In this article, we’ll walk you through the process of getting AdSense approval, adding ads to your WordPress blog, and ensuring everything works smoothly. With the expertise of Troubleshoot Limited, setting up AdSense becomes an easy, stress-free task.
1. What is Google AdSense and Why Should You Use It?
Before jumping into the installation steps, let’s briefly discuss what Google AdSense is and why it’s a valuable tool for bloggers.

Google AdSense is an ad program that allows you to place advertisements on your blog. Every time someone clicks on an ad, you earn a small commission. It’s a powerful way to monetize your website, especially if you’re just starting out and don’t have your own products or services to sell.
At Troubleshoot Limited, we offer specialized WordPress support, so whether you're just setting up your blog or need ongoing assistance, we’re here to make sure your monetization efforts are successful.
2. How to Get AdSense Approval for Your WordPress Blog
The first and most crucial step to getting started with Google AdSense is approval. To maximize your chances of approval, your blog needs to meet a few requirements. Here's how Troubleshoot Limited can assist you:
Step 1: Make Sure Your Blog is Ready
Content Quality: Google requires high-quality, original content. We at Troubleshoot Limited can help you ensure your content is top-notch, engaging, and compliant with AdSense guidelines.
Design: Your blog should have a clean, professional design. Troubleshoot Limited provides website design services, ensuring your site looks polished and user-friendly, making it more likely for Google to approve it.
Step 2: Apply for AdSense Once your blog meets the requirements, visit Google AdSense and apply. If you need assistance during this process, Troubleshoot Limited is ready to help with your application.
Step 3: Wait for Approval Google will review your blog, and once approved, you’ll receive a notification. If your application is rejected, don’t worry! With our help, you can identify issues and reapply once improvements are made.
3. How to Add Google AdSense to Your WordPress Blog
After getting approved, it’s time to add AdSense ads to your blog. You can either do this manually or use a plugin—whichever method works best for you. If you need assistance with the technical aspects, Troubleshoot Limited can support you through the process.

Option 1: Manually Add AdSense Code to WordPress
Step 1: Log into Your AdSense Account
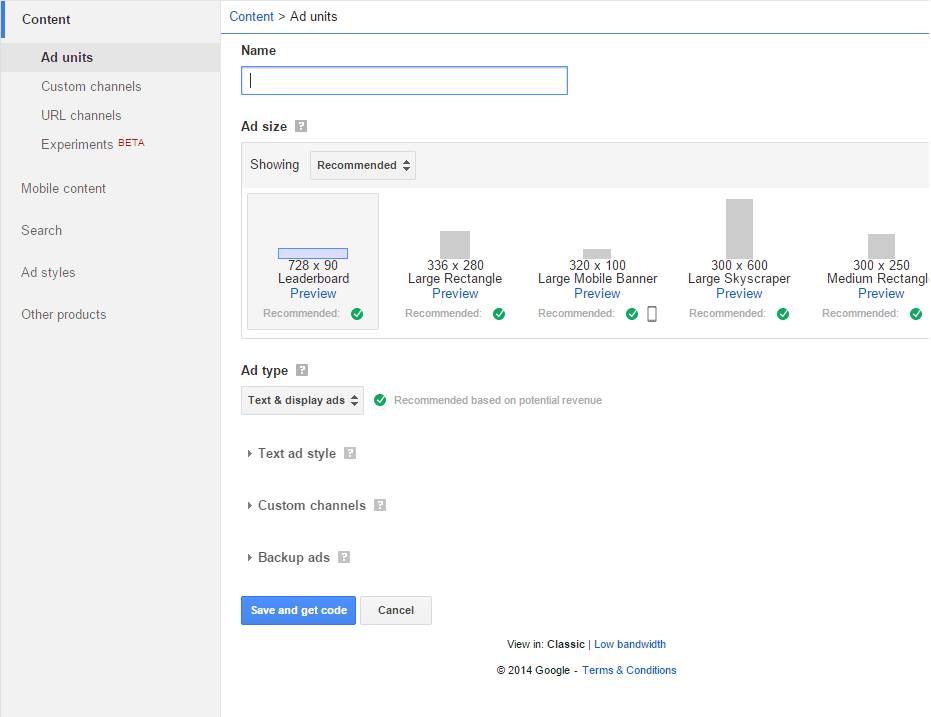
After logging into AdSense, create your ad units. Choose the type and size that you want to display on your blog.
Step 2: Add AdSense Code to Your WordPress Blog
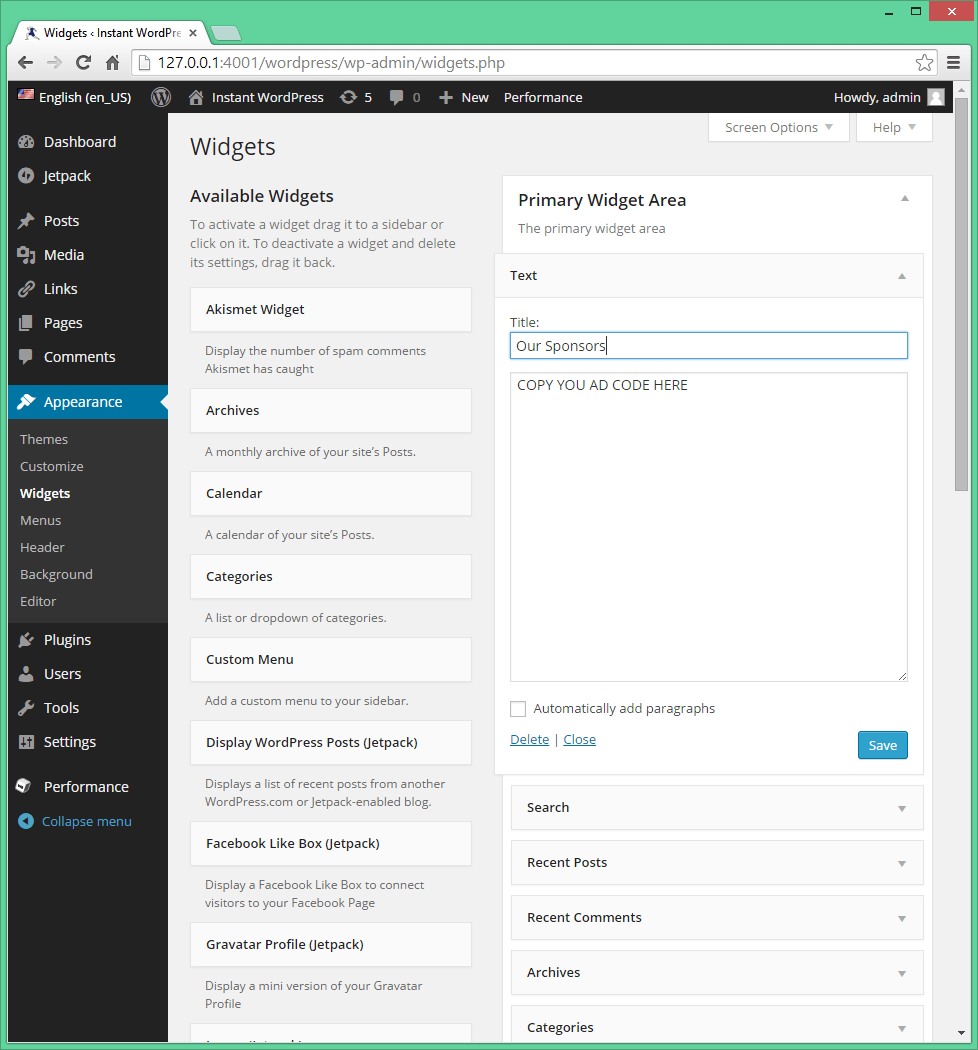
In your WordPress dashboard, go to Appearance > Widgets, and add a Text Widget to your sidebar or footer.
Paste the AdSense code into the widget and save the changes.
For a more hands-on approach, Troubleshoot Limited can help you insert the code into your theme files or optimize your ad placement for better visibility.

Option 2: Use a Plugin to Add Ads
For those who prefer a less technical approach, we recommend using a plugin like Ad Inserter or Advanced Ads. These plugins make it easy to insert AdSense code without needing to touch any code directly.
Step 1: Install a Plugin
Go to Plugins > Add New in your WordPress dashboard, search for the plugin, and install it.
Step 2: Configure the Plugin
Once activated, paste your AdSense code into the plugin’s settings, and specify where you want your ads to appear (e.g., sidebar, posts, homepage). This method ensures that you don’t have to worry about placement manually.
At Troubleshoot Limited, we can recommend the best plugins based on your site’s needs and ensure everything is configured correctly.
4. How to Place Ads on Your WordPress Blog
After adding your AdSense code, the next step is placing the ads strategically on your site. Proper placement can increase your click-through rates and optimize revenue.
Sidebar: One of the most popular locations for ads is the sidebar. It’s visible and easily accessible to your audience.
In-Content Ads: These ads appear within your posts, typically after a few paragraphs. In-content ads tend to generate better engagement and revenue since they’re integrated within the user’s reading experience.
Footer Ads: Ads placed in the footer can still earn clicks, though they are less prominent. They can work well as an additional placement strategy.
5. How to Optimize Your AdSense Earnings
Now that your AdSense ads are up and running, you want to maximize the revenue they generate. Here are a few tips:
Focus on High-Quality Content: Engaging content attracts more visitors, which translates to more potential clicks. Troubleshoot Limited offers content optimization services that ensure your blog is optimized for AdSense and user engagement.
Experiment with Ad Placement: Not all placements will perform the same. Use Google AdSense Auto Ads to help determine the best placement for each ad type automatically.
Monitor Your Performance: Regularly check your AdSense account for performance metrics. At Troubleshoot Limited, we offer analytics services that help you track how well your ads are doing, allowing you to make data-driven decisions.
Conclusion: Boost Your Blog’s Revenue with AdSense
Installing Google AdSense on your WordPress.org blog is one of the most effective ways to start generating income from your site. While the process may seem technical, Troubleshoot Limited is here to make it easy. From helping you get approved by AdSense to optimizing your ad placements for better earnings, we are your dedicated partner in achieving success online.
Take the first step today—apply for AdSense, implement the ads, and optimize your blog for maximum revenue. If you need any assistance along the way, don’t hesitate to reach out to Troubleshoot Limited. We’ll handle the technical aspects so you can focus on growing your blog and your income.


Post Your Comments