Whether you’re looking to separate personal files from system files, install multiple operating systems, or simply make file management easier, partitioning a hard drive can be a fantastic solution. While the process may sound a bit technical, it’s actually a straightforward procedure. In this guide, we’ll break down why partitioning is beneficial, how to partition a hard drive (even if it’s already full), and walk through dividing your C drive into additional partitions like D and E.
Why Partition a Hard Drive?
Partitioning essentially splits a single hard drive into multiple, separate “drives” within your computer. You’ll still have one physical hard drive, but each partition behaves as an independent section, often labeled C:, D:, and so forth. Here’s why this is useful:
1. Organizational Benefits: Partitioning can help you separate personal files, programs, or even different projects or clients’ files. You could keep all system files on one partition and files or applications on another.
2. Improved Performance: Partitioning can make it easier for your system to locate files, potentially enhancing your computer's speed, especially when separating system files from user data.
3. Easier Backups and Recovery: If one partition encounters an issue, the others are less likely to be affected. This separation can make data recovery more manageable and backups more targeted.
4. Multi-Operating System Support: Partitioning also enables you to install different operating systems on each partition if needed, so you can easily switch between them.
Can You Partition a Full Hard Drive?
If your hard drive is already packed with data, you might wonder if it’s too late to partition. The good news? You can still partition a full hard drive, but it may involve a bit more caution. When creating partitions on a nearly full drive, you’ll need enough free space to shrink your current partition and create a new one. If not, you may need to free up some space by deleting unneeded files or moving them temporarily to external storage.
How to Partition Your Hard Drive (Using Windows Built-In Tools)
Before we begin, it’s wise to back up any important data on your hard drive. While partitioning is typically safe, there’s always a small risk of data loss during the process.
Step 1: Open Disk Management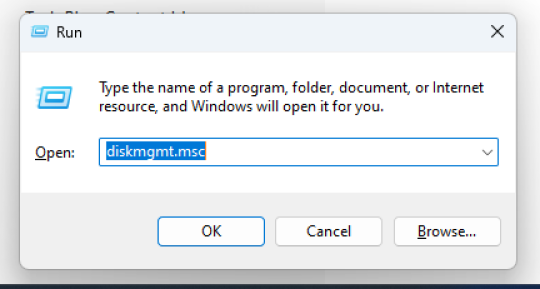
1. Press Win + R to open the Run dialog box.
2. Type diskmgmt.msc and press Enter. This will open Windows Disk Management, a built-in tool for managing your drive’s partitions.
Step 2: Locate Your Drive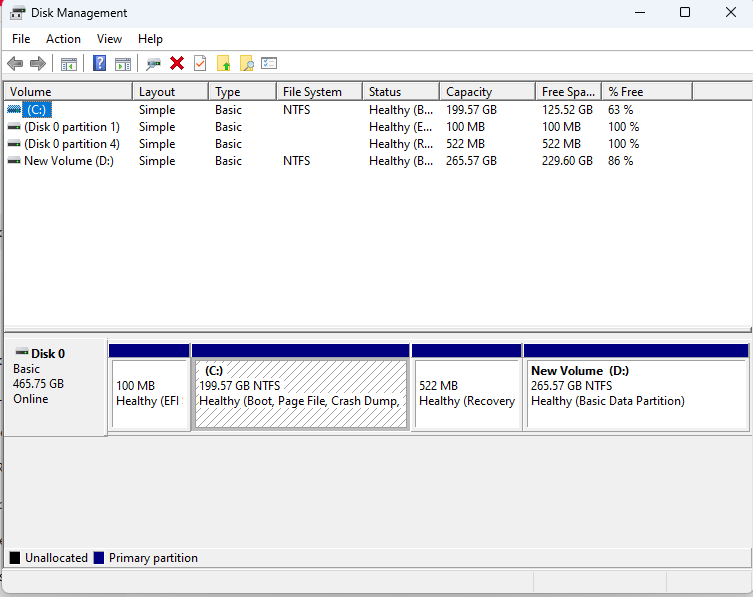
In Disk Management, you’ll see a list of your drives and their existing partitions. Look for Disk 0 (this is usually your main hard drive).
Step 3: Shrink the Current Partition (C Drive)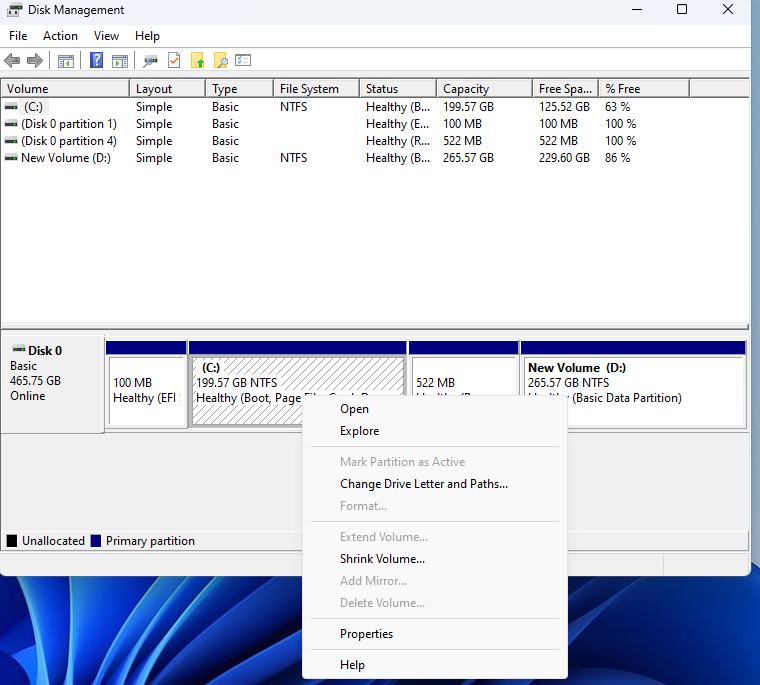
To create space for a new partition, you need to shrink the existing one:
1. Right-click on the partition you want to shrink (usually C Drive) and select Shrink Volume.
2. Enter the amount of space to shrink (in MB). For example, if you want to create a D drive with 50 GB, enter 50,000 MB.
3. Click Shrink. You’ll now see a new block labeled Unallocated Space next to your existing partition.
Step 4: Create a New Partition (D or E Drive)
Now that you have unallocated space, it’s time to turn it into a new drive:
1. Right-click on the unallocated space and select New Simple Volume.
2. Follow the on-screen instructions to set up the new partition, including selecting a drive letter (e.g., D or E).
3. Format the partition (NTFS is typically recommended for Windows), then complete the setup.
Congratulations! You’ve now successfully split your C drive into separate partitions.
How to Partition a Hard Drive on macOS
If you’re using a Mac, partitioning is also possible but follows a different process:
1. Open Disk Utility (found in Applications > Utilities).
2. Select your drive from the left-hand menu.
3. Click the Partition button and choose Add Partition.
4. Specify the size of the new partition and select a format (APFS for newer macOS versions or Mac OS Extended).
5. Click Apply to confirm and create the new partition.
Helpful Tips and Best Practices for Partitioning
1. Consider Partition Size Carefully: Think about your storage needs and allocate space wisely, especially if you're creating partitions for different uses, like one for media files and another for applications.
2. Defragment Regularly: Keeping your files organized through defragmentation can help the partitioning process run more smoothly, especially on older hard drives.
3. Avoid Excessive Partitioning: While partitioning offers benefits, dividing your hard drive into too many partitions can become confusing. For most users, two or three partitions work best.
4. Be Cautious with Sensitive Data: If you have sensitive information, consider keeping it on a separate partition that isn’t regularly accessed, enhancing its security.
Conclusion: Take Control of Your Storage
Partitioning your hard drive gives you more control over your storage, helping you organize files, improve system performance, and even manage multiple operating systems. Although the idea of splitting a drive can seem intimidating, tools like Windows Disk Management and macOS Disk Utility make it accessible, even if you’re new to the process.
So why wait? With a bit of planning, you can set up your partitions today, making your digital life more organized and efficient.




Post Your Comments